Chatbots have moved beyond text-based Q&A to become execution environments. Today, developers use them as runtime hosts where tools execute, UI widgets render inline, and user interactions feed back to the model in real time.

However, the developer experience is fragmented. OpenAI uses a proprietary Apps SDK for ChatGPT, while Anthropic Claude follows the Model Context Protocol (MCP). Building and maintaining separate integrations for each platform increases maintenance costs.
Skybridge addresses these challenges. It is an open-source React framework that abstracts host-specific differences. You write one application and deploy it to ChatGPT, Claude, or any MCP-compatible client.
This article demonstrates how to build a unified AI app from scratch, moving from basic tool calls to an interactive, state-synchronized interface.
Why use Skybridge?
If you are wondering about Skybridge, check out the troubles it takes away from developers.
What problem does Skybridge solve?
Each major AI platform comes with its own unique runtime behaviors, protocol specifications, and widget embedding rules. Skybridge acts as a write-once, run-anywhere abstraction layer that automatically manages protocol bridging and host-specific nuances, allowing a single React app to deploy effortlessly across ChatGPT, Claude, and VS Code.
How does Skybridge speed up MCP app development?
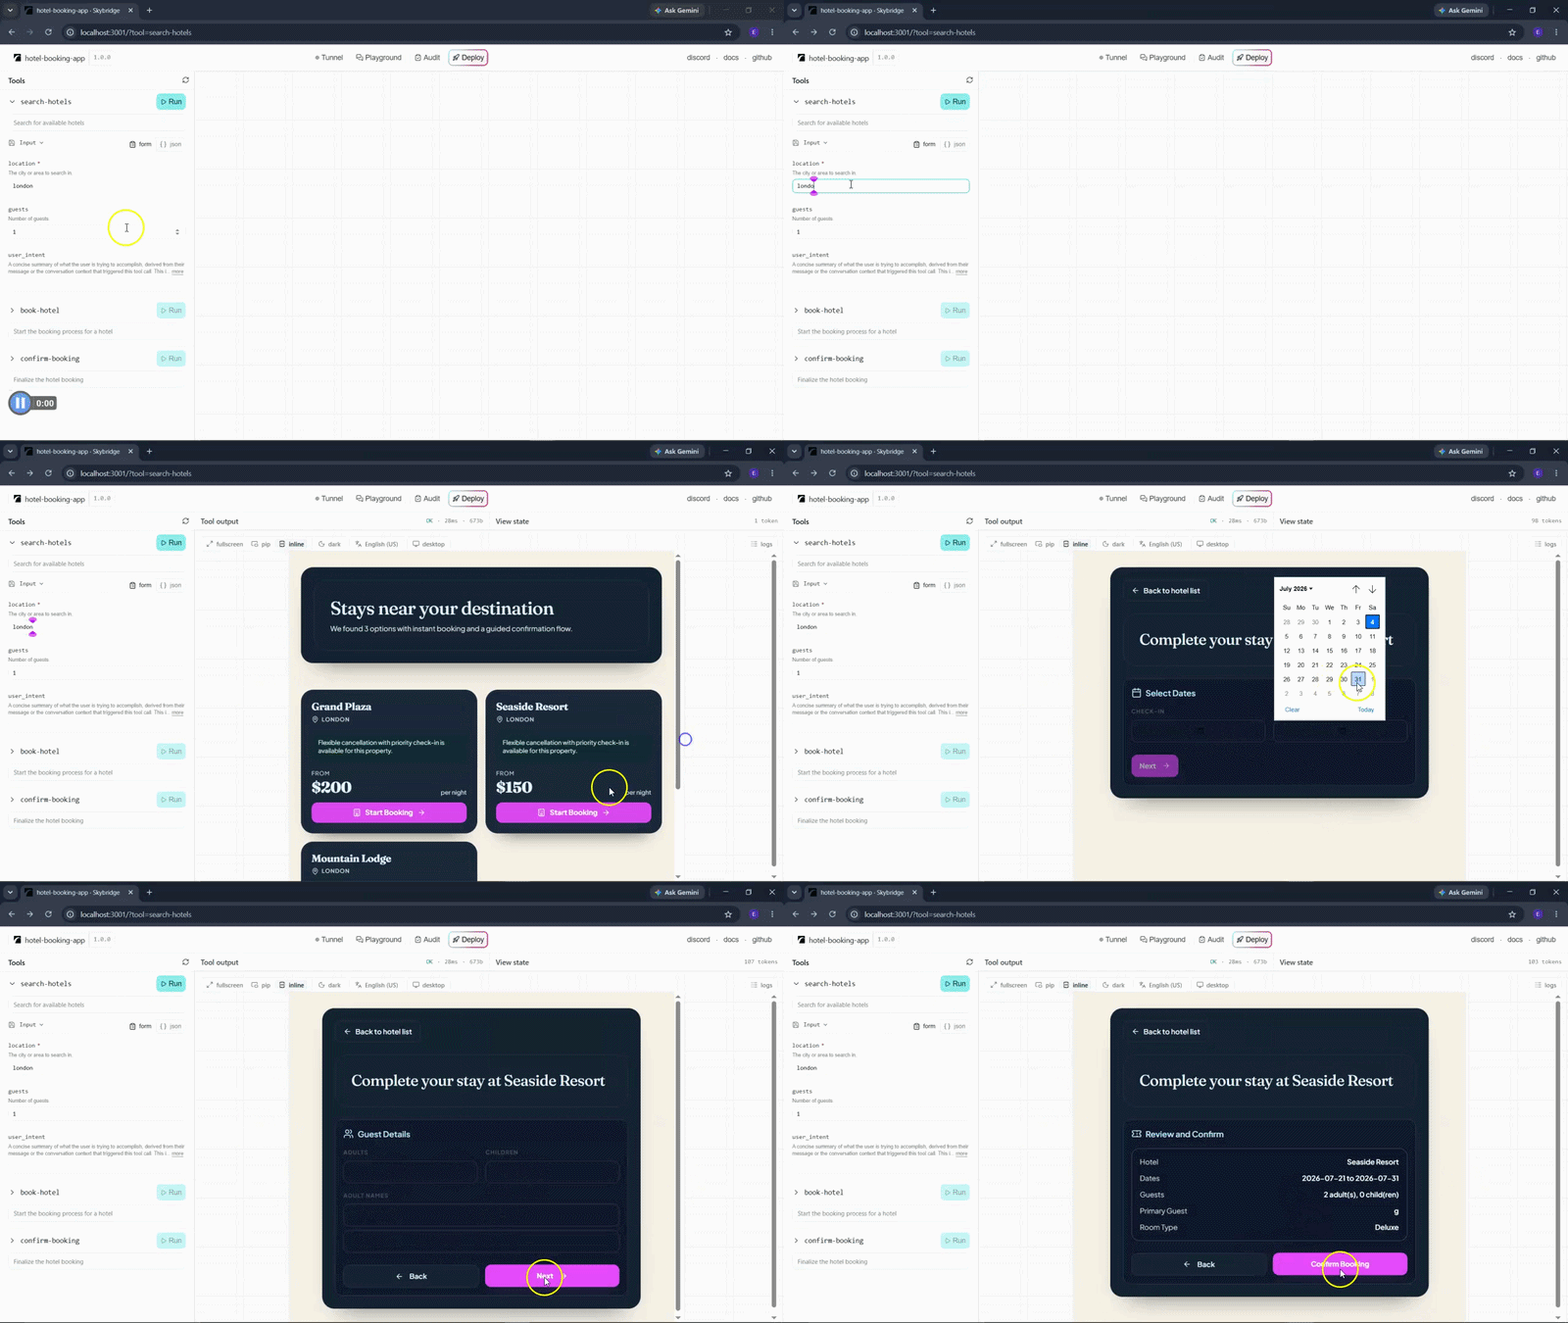
Testing an MCP app usually involves a tedious loop: deploying your app, opening a manual tunnel, connecting to a live chatbot, and constantly triggering model responses to check your changes. Skybridge eliminates this friction with a dedicated developer dashboard, which we’ll explore during our testing phase.
What do you need before using Skybridge?
Ensure you have these tools and accounts ready:
- Node.js 24 or later
- Package manager: npm, pnpm, yarn, or bun
- ChatGPT account with developer access
- Claude account with connector access
How do you create a Skybridge project?
We will start by scaffolding a new project.
Open your terminal and run the following command:
npm create skybridge@latest hotel-app
cd hotel-app
npm install
This command creates an Express-based MCP server and a Vite-powered React application.
The above command sets up a boilerplate with an Express-based MCP server and a Vite-powered React application.
Skybridge offers direct integration with the Vite ecosystem.
You can check out vite.config.ts file for further configuration if you need to.
What is the Skybridge developer dashboard?
Skybridge provides a local developer dashboard at
This comes with the following tools:
- Alpic Playground: Local sandbox with hot module replacement (HMR). Iterate on React widgets without connecting to a live AI model
- Integrated Secure Tunnel: Exposes your local server through a temporary public URL with one click. Paste this URL into ChatGPT or Claude connector settings
- Beacon Audit Tool: Scans app metadata and security policies. It catches common rejection triggers before store submission
How do you build a ChatGPT app with Skybridge?
For this project, we will build a hotel booking app that works inside AI agents.
We will start by setting up the MCP server and registering a tool to search for hotels.
How do you create MCP tools in Skybridge?
Create a server.ts file and register search-hotels tool like so:
import { McpServer } from "skybridge/server";
import { z } from "zod";

const server = new McpServer({
  name: "hotel-booking-app",
  version: "1.0.0"
}, {});

server.registerTool({
  name: "search-hotels",
  description: "Searches for available hotels in a city.",
  inputSchema: {
    location: z.string().describe("The city to search in")
  },
  view: {
    component: "hotel-results",
    description: "Displays a list of available hotels."
  }
}, async ({ location }) => {
  const hotels = [
    { id: "h1", name: "Grand Plaza", price: 200, rating: 4.5, location },
    { id: "h2", name: "Seaside Resort", price: 150, rating: 4.2, location },
  ];

  return {
    structuredContent: { hotels }, // Data passed to React
    content: [{ type: "text", text: `Found ${hotels.length} hotels in ${location}.` }],
    isError: false,
  };
});

export type AppType = typeof server;
We have just defined a tool contract. The view property tells the Skybridge runtime to render the hotel-results component when the model calls search-hotels
You can further refine the tool’s behavior with the annotations property:
server.registerTool({
  name: "search-hotels",
  annotations: {
    title: "Available Hotels",
  },
  // rest of config
});
Annotations help the AI host display readable titles in chat logs. Skybridge Beacon Audit Tool also checks this metadata as part of quality validation. For this demo, hotel data is hardcoded.
Next, build the React component that renders search results for the discovery view.
How do you enable end-to-end type safety in Skybridge?
Before we set up the discovery view, create a helpers.ts file.
This file will provide the view with the exact tool input and output types from the server contract.
This is the content of the file:
import { generateHelpers } from "skybridge/web";
import type { AppType } from "./server.js";

export const { useToolInfo, useCallTool } = generateHelpers();
generateHelpers uses your McpServer TypeScript type to provide autocomplete and validation for tool names, inputs, and outputs in the views.
More great articles from LogRocket:
How do you build a React view in Skybridge?
The discovery view is the first interface the user sees after the model calls search-hotels tool.
Create a hotel.tsx file with the following code:
import { useState } from "react";
import { useLayout } from "skybridge/web";
import { useToolInfo } from "../helpers.js";
import Booking from "./booking.js";
import { Star, MapPin, Hotel, ArrowRight, Sparkles, Compass } from "lucide-react";
export default function HotelResults() {
const { theme } = useLayout();
const { output } = useToolInfo<"search-hotels">();
const hotels = output?.hotels || [];
const [selectedHotel, setSelectedHotel] = useState<{ id: string; name: string } | null>(null);
if (selectedHotel) {
return (
setSelectedHotel(null)}
/>
);
}
return (
Stays near your destination
We found {hotels.length} options with instant booking support and synchronized steps.
{hotels.map((hotel) => (
{hotel.name}
))}
);
}
This view reads output.hotels with useToolInfo, renders each hotel card, and transitions to the booking experience when the user clicks Start Booking.
At this stage, the app can search and display hotels. Next, we will add tools to collect booking details and finalize reservations.
To make the app interactive, we will add a Book Now and confirm booking tools.
How do you register a book-hotel tool?
Update the server.ts file to register the book-hotel tool like so:
server.registerTool({
  name: "book-hotel",
  description: "Initiates the booking process for a selected hotel.",
  inputSchema: {
    hotelId: z.string().describe("The ID of the hotel to book."),
    hotelName: z.string().describe("The name of the hotel."),
  },
  view: {
    component: "booking",
    description: "Multi-step booking form."
  }
}, async ({ hotelId, hotelName }) => {
  return {
    structuredContent: { hotelId, hotelName },
    content: [{ type: "text", text: `Starting booking for ${hotelName}...` }],
    isError: false,
  };
});
The book-hotel tool defines the required schema and links to the booking view component.
It runs when the user starts the booking flow.
How do you register a confirm-booking tool?
To finalize a booking after form completion, we will add a confirm-booking tool for this.
Go ahead and add this to the server.ts file:
server.registerTool({
  name: "confirm-booking",
  description: "Finalize the hotel booking",
  inputSchema: {
    hotelId: z.string(),
    guestName: z.string(),
  },
}, async (details) => {
  const confirmationNumber = `BK-${Math.random().toString(36).substring(2, 9).toUpperCase()}`;
  return {
    structuredContent: { ...details, confirmationNumber },
    content: [{ type: "text", text: `Booking confirmed! #:${confirmationNumber}` }],
    isError: false,
  };
});
By omitting the view property, you create an execution tool. The AI can call it in the background after it gathers required arguments from view state or chat context.
How do you create the booking view in Skybridge?
Create booking.tsx file and add the following code to it:
import { useState } from "react";
import { useLayout } from "skybridge/web";
import { useToolInfo, useCallTool } from "../helpers.js";
import { Calendar, Users, BedDouble, Ticket, ArrowRight, Waves } from "lucide-react";
export default function Booking() {
const { theme } = useLayout();
const { input, output } = useToolInfo<"book-hotel">();
const hotelName = output?.hotelName || input?.hotelName;
const [state, setState] = useState({
step: 0,
checkIn: "",
checkOut: "",
llmStatus: "Dates pending",
});
const { callTool, isPending } = useCallTool<"confirm-booking">("confirm-booking");
if (!hotelName) return null;
const nextStep = () => setState(s => ({ ...s, step: s.step + 1 }));
const progressSteps = ["Dates", "Guests", "Room", "Review"];
return (
Complete your stay at {hotelName}
{progressSteps.map((label, idx) => (
{idx + 1}. {label}
))}
{state.step === 0 && (
{/* form fields */}
)}
{state.step === 1 && (
)}
{state.step === 2 && (
)}
{state.step === 3 && (
)}
);
}
The hidden data-llm block keeps the model aware of current form progress and entered values, which helps it decide when to call confirm-booking
With both views and tools wired together, let’s go ahead and test it.
How do you test a Skybridge app?
I will first go ahead and test it out in the developer dashboard:
This is the result of my test in Claude Desktop:
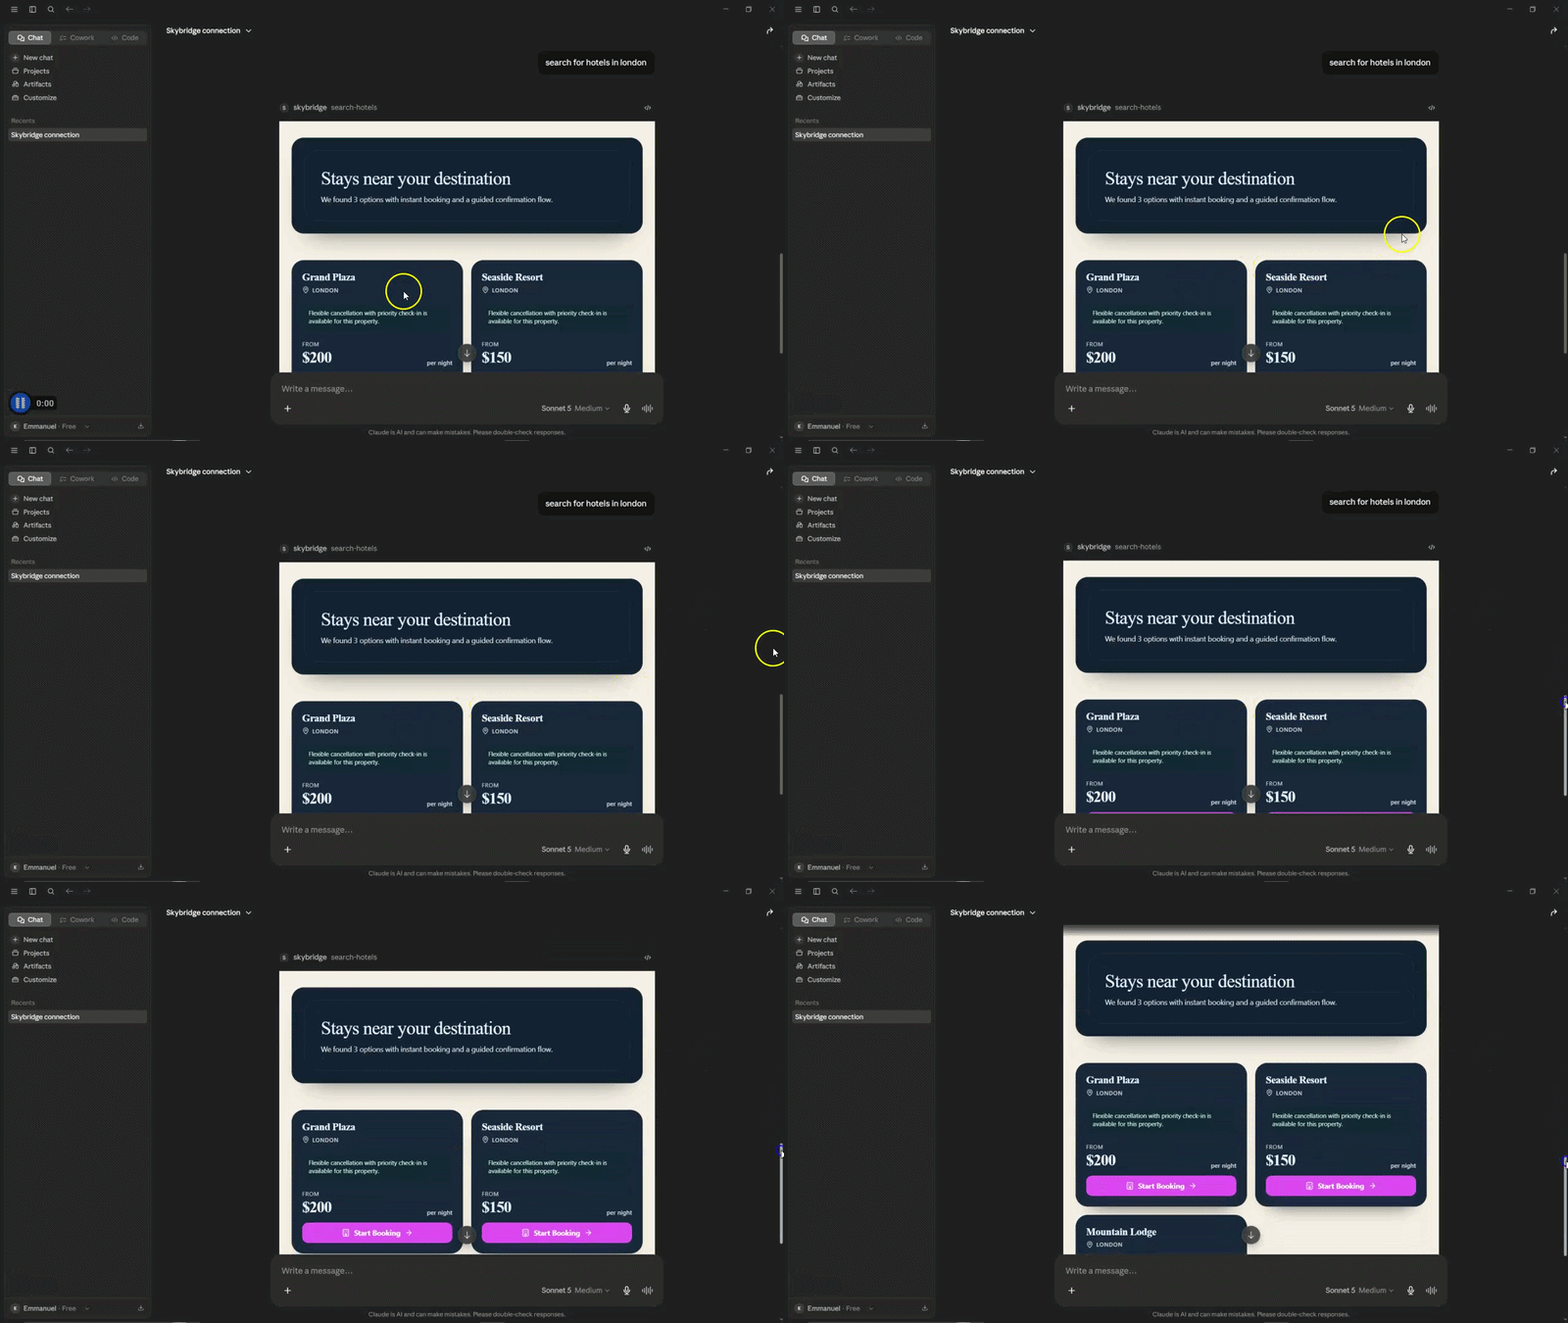
To test it in Claude, do the following:
- Start the development server
- Open the development dashboard
- Start the tunnel
Thereafter, copy the MCP URL and add it to the connectors in Claude Desktop
The final implementation is available in the hotel booking GitHub repository.
What are Skybridge’s limitations?
Skybridge simplifies MCP development, but a few constraints still matter:
- React-Focused: Currently, the frontend view layer requires React
- Node.js Environment: The local server component requires a Node.js runtime
- Provider Support: While compatible with the MCP standard, some advanced host-specific UI capabilities may still be under development
Conclusion
Developing for the agentic web should not require duplicate integrations or deep protocol expertise. Skybridge gives you one path for building interactive, state-synchronized apps that work across major chatbot platforms. By centering development on shared tools and views, you can ship richer AI experiences with lower maintenance costs.